
Once upon a time, migrating your AAD Connect primary sync server configuration to your staging server was a simple matter of using the Get-ADSyncServerConfiguration and Set-ADSyncServerConfiguration cmdlets provided as part of the ADSync module.
However, in the most recent versions of AAD Connect (v 1.1.751 and later) the Get-ADSyncServerConfiguration cmdlet still works, however the Set-ADSyncServerConfiguration cmdlet returns a warning that use of the cmdlet is now unsupported…

(I suspect that someone must have shot themselves in the foot somehow with this method and then tried to get Premier to help them out of the mess… but I digress)
The best, and currently supported method of migrating your configuration from a primary sync server to a staging mode server is to duplicate all the custom sync rules by exporting the custom rules from the Sync Rules Editor on the primary server.
You can select one or more rules (using Ctrl-click, or Shift-Click) in the editor, and then click Export to be presented with a notepad document containing an export of all the necessary PowerShell commands to re-create the sync rules.

This is great for backing up and restoring rules on the same server, however the PowerShell commands that are returned in the notepad document include a reference to the Connector ID value.
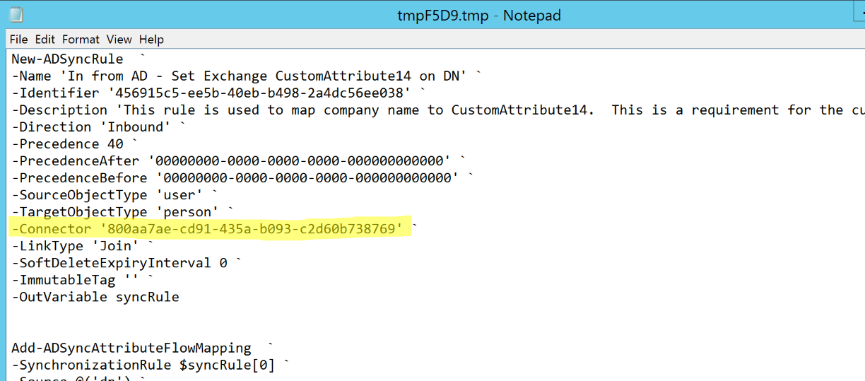
In my lab, the connector ID value for contoso.com is 800aa7ae-cd91-435a-b093-c2d60b738769
You can see the same information on the server using the Get-ADSyncConnector cmdlet
Get-ADSyncConnector | Select Name, Identifier

Sadly, on my staging server the connector ID value is different, as seen below.

This means that I cannot simply take my exported PowerShell commands from my primary sync server and run them on the staging server. If I did, I’d get something like this…
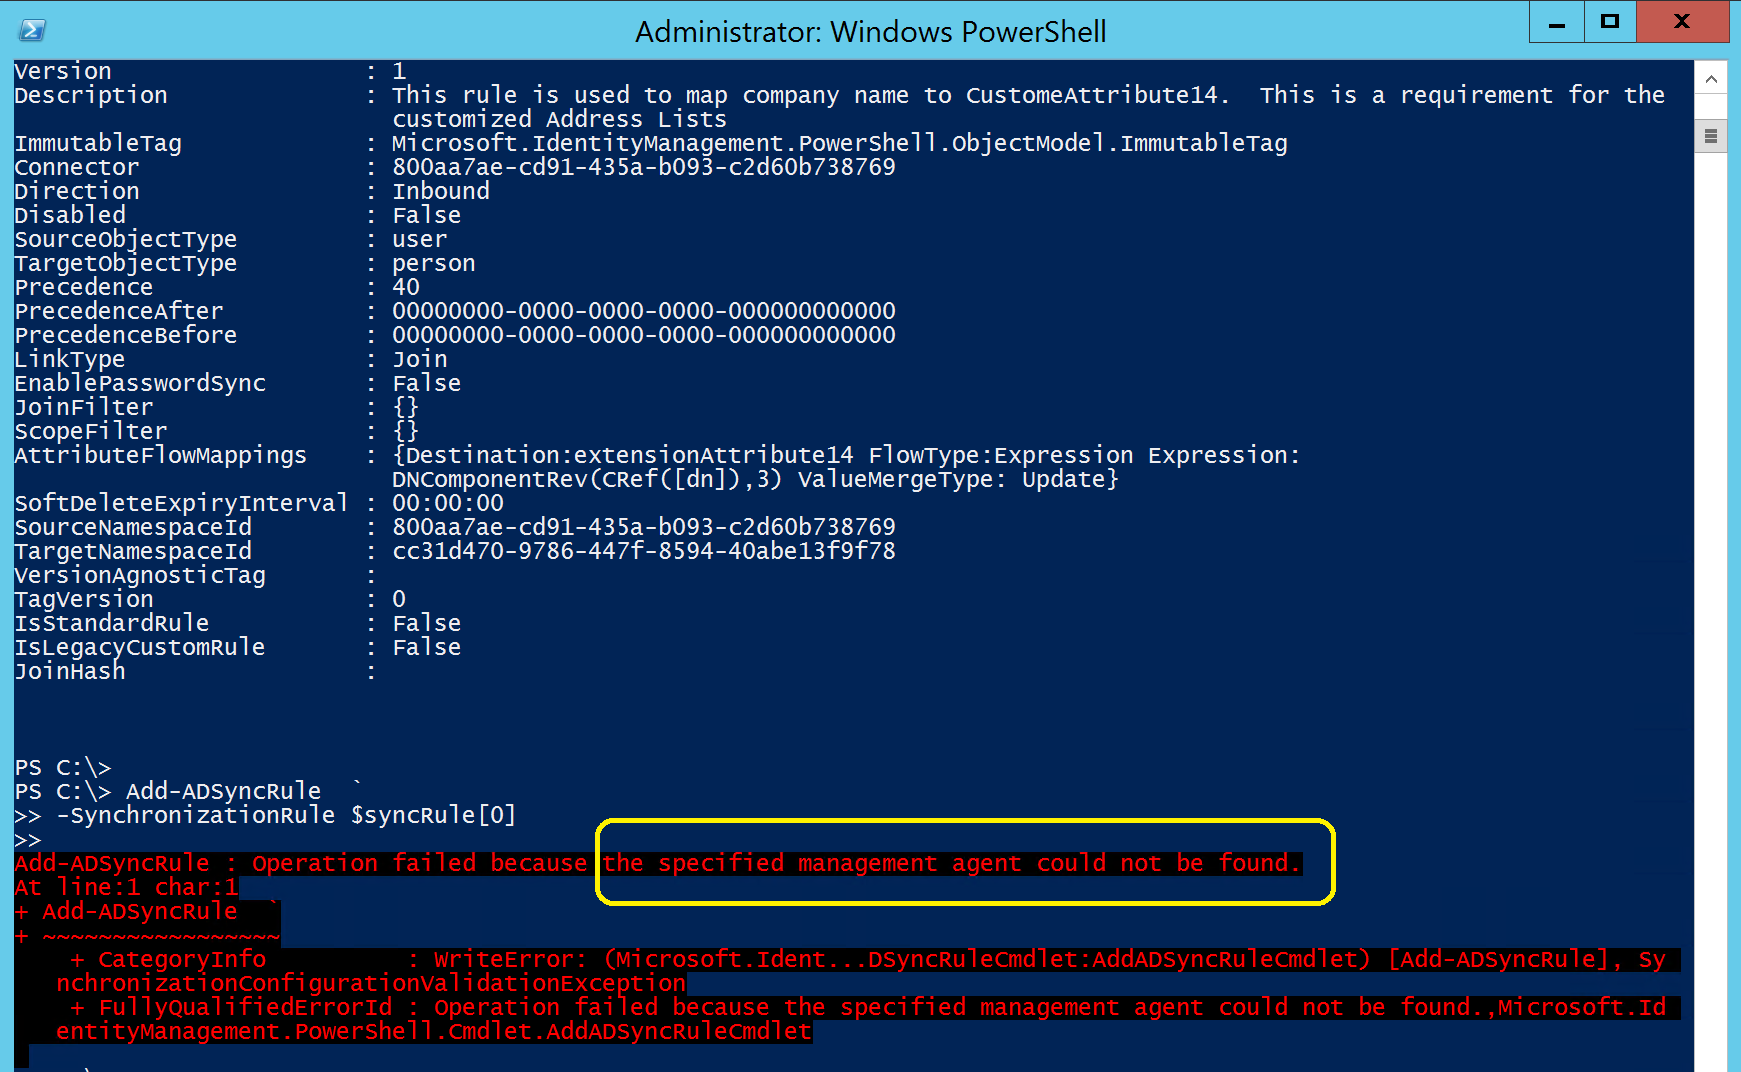
The error – specified management agent cannot be found – is due to the mismatch of connector ID value.
(note: the term “Management Agent” makes reference to a term in FIM/MIM – which AAD Connect is based on – in AAD Connect it’s called a “Connector” )
As a result, we need to modify the PowerShell commands, updating the connector reference, before we can run the commands on our staging server.
The Solution…
To help simplify this process, and to automatically update the sync rules to match the target server connector GUIDs, I’ve created the AADCHelper PowerShell module, it’s currently a collection of functions that I’ve built for the purposes of reporting and converting sync rule exports to work on other servers.
(Before following any of the steps below, be sure to back up your server configuration and sync rules on both your primary sync server and your new staging server)
Firstly, you want to identify all disabled rules on the primary and disable those on the staging server.
If the custom rules on the primary server are a result of cloned default rules, we will want to disable the same default rules on the staging server (because we’re importing the same cloned rules). In the module, there’s a function called Get-DisabledRules – use this cmdlet on the primary sync server to generate a list of all the disabled rules.

Once you have the list of disabled rules, proceed to your new staging server and launch the Sync Rules Editor.
Locate each rule (compare number AND name, to make sure the rule numbers align), click on the rule and select Edit.
When prompted to clone the rule, click NO. (We are just disabling it, and we don’t want to create a cloned copy – if you click Yes, it will clone the rule – do don’t do that)
Select the Disabled check-box and click Save.
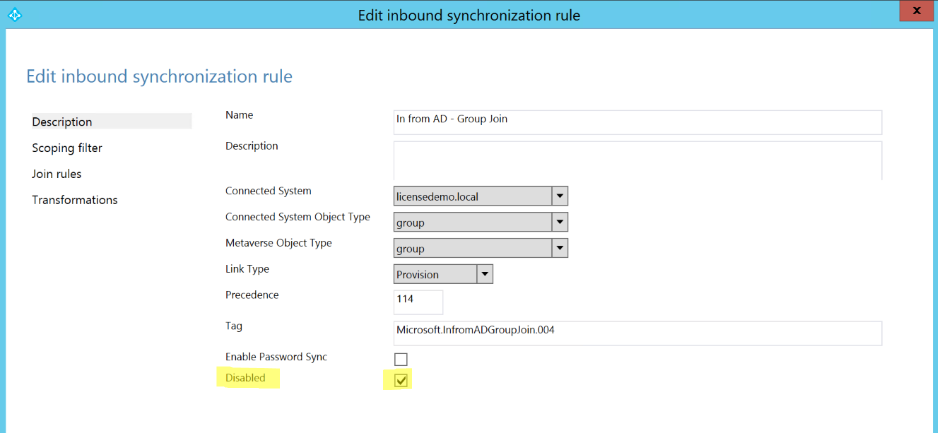
Note: upgrades to AAD Connect will replace these rules, but they will remain disabled.
Second, export your custom rules from the Primary server to individual TXT files to be copied to the staging server.
Launch the sync rule editor on the Primary sync server, start with the Inbound rules, and export all the CUSTOM rules for each connector into their own TXT file.
You can select one or more rules (using Ctrl-click, or Shift-Click) in the editor, and then click Export to be presented with a notepad document containing an export of all the necessary PowerShell commands to re-create the sync rules.
You’ll want to change the Direction dropdown to Outbound and export those rules as well to separate TXT files.
Make sure you export each connector and direction separately into their own files…
For example:
- Active Directory Connector Custom Inbound Rules
- Active Directory Connector Custom Outbound Rules
- Azure Connector Custom Inbound Rules
- Azure Connector Custom Outbound Rules
If you have more than one AD forest, then you’ll want export TXT files for each direction for each connector.
If you don’t have any custom rules for Azure or a particular connector, don’t bother exporting anything for that connector.
Third, import the custom rules on the staging server.
Now that you’ve exported all the custom rules on the staging server, copy your export TXT (or PS1) files from the primary sync server to the staging server.
The next function, Import-SyncRules, is the real workhorse here, it does the sync rule conversion so that you can simply run the PS1 file to import the rules from the primary server.
Simply run the cmdlet Import-CustomRules with the -FileName parameter set to the PS1 or TXT file which contains your exported rules from the primary sync server.
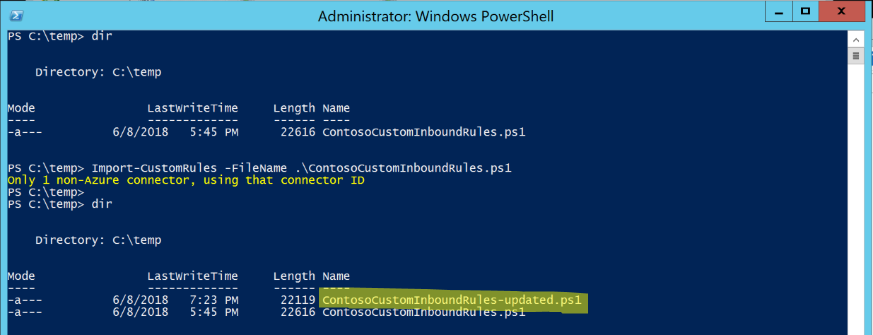
Note : the cmdlet identified there is only 1 Active Directory connector (ie. non-Azure) and therefore it defaults to that connector for the replacement action within the file.
If there were more than 1 Active Directory (see below), you will be prompted to choose the connector that the rules should be applied to.

You would enter the number value for the connector the export is for, and press <enter>
The cmdlet will save a new file to the same folder, with the addition of the text -updated to the end of the file.
If this is a PS1 file, you can simply run it to apply the customizations, if it’s a TXT file it either needs to be renamed to PS1 or the contents copied and pasted into a PowerShell window.
Note: the Azure Connector GUID is the same on every server, the Microsoft Product Group used a constant value for that connector, so you do not need to run the Import-CustomRules cmdlet on the TXT files you exported for the Azure connector.
Finally, confirm that all the custom rules match between the Primary and Staging servers.
Once you have completed the re-import of custom rules on your staging server, you can then use the Get-CustomRules cmdlet on both servers to generate a report of all custom rules for comparison purposes.

Make sure that the custom rules were successfully imported into the staging server, the names and numbers of the rules should all match. If anything is missing, identify why it didn’t import properly on the staging server.
One of the most common reasons a rule might not import properly on the staging server is that it’s using a Metaverse schema attribute that was created manually on the Primary sync server. If that is the case, manually create the custom schema attribute in the Metaverse on the staging server and try the rule import again.
In closing – the process outlined above, and the helper scripts I’ve provided, should make the forklift of sync rule customizations from your primary to staging mode servers both easier and more reliable. That said, make sure to make a backup of your server before making any changes.
The AADCHelper PowerShell Module and how to install it can be found here
Make sure to install the module on both the Primary and Staging servers using the instructions provided on the gallery page!